To use that WordPress theme properly, you need to have WordPress 4.0 (or higher version) site with PHP 5.4 (or higher version) running on your hosting server. If you don’t have WordPress installed in your server, get a managed WordPress hosting from us? We are providing very low cost but powerful WordPress hosting for our customers. For help regarding WordPress installation please see that codex link
Here following some more important resources from Codex :
WordPress theme installation is a really simple process and when you are using Doxy WordPress theme then its become easier steps. If you don’t have any idea about WordPress theme installation process, please see the blog post How to install WordPress theme?
In order to install that WordPress theme please follow the steps below :
Step 1: At first Login to your website as an administrator. Then go to Dashboard > Appearance and then Click on Themes Menu.
Step 2: Now click on Add New button from the top area of the Themes menu Page.
Step 3: Now you will get an interface to upload the theme. Upload our theme’s zip file there.
Step 4: After uploading the theme file in your WordPress admin area, click on the Install Now button there.
After a successful installation of the theme, click on the Activate button and then your site will be ready to use our theme.
###Import Demo Automatically
Importing demo data on Doxy theme is very simple. Go to the Dashboard and select Appearance->Import Demo Data then Click on “Import Demo Data”, save the changes when it’s done.
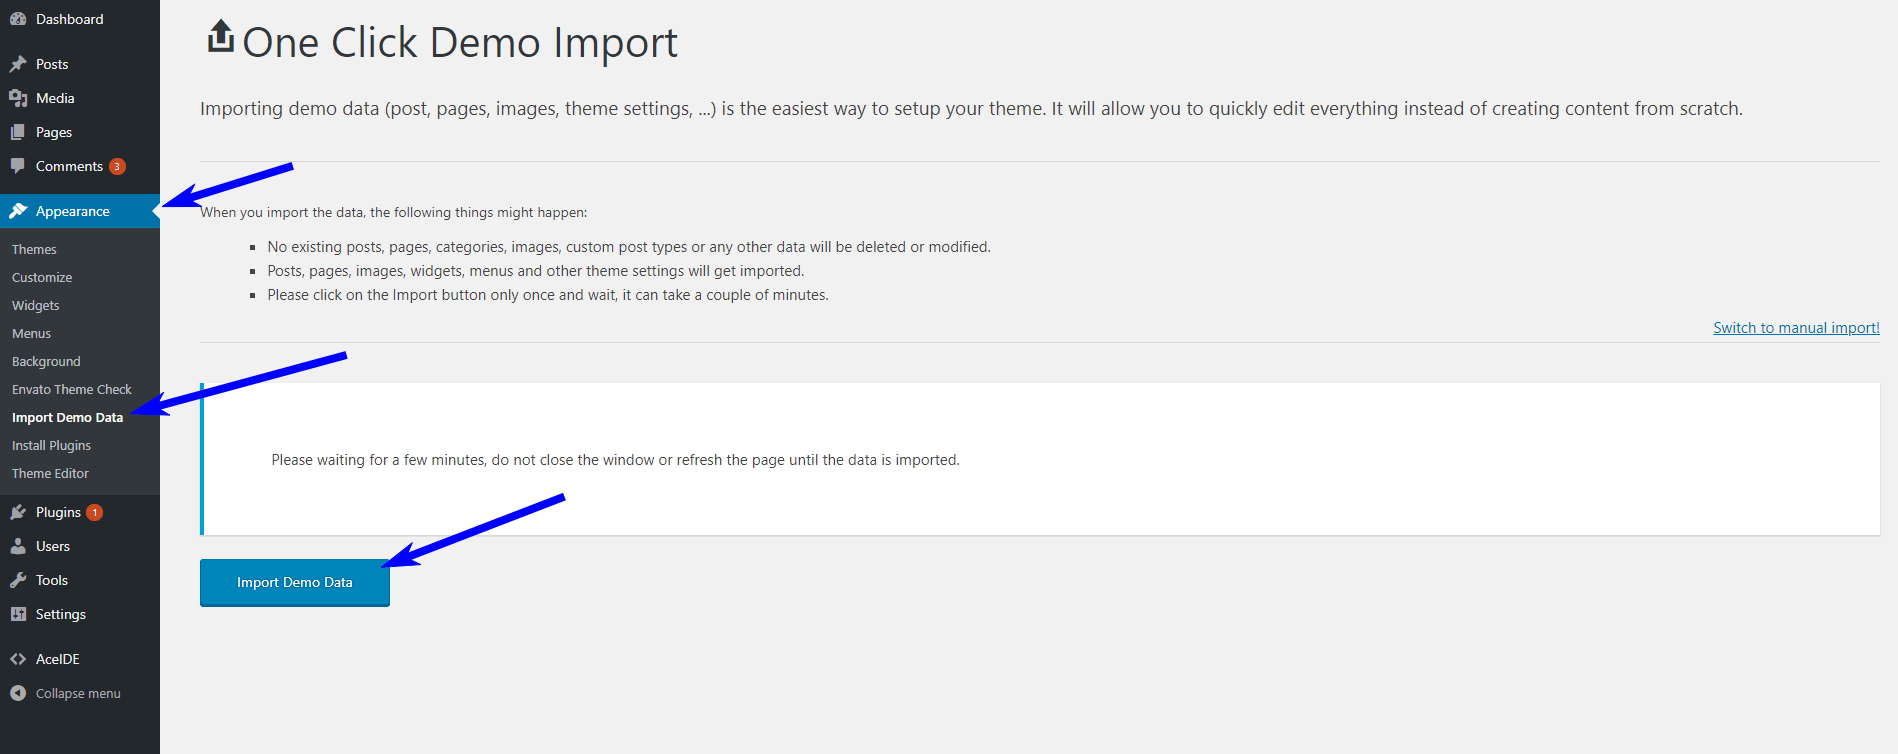
If you’ve already used the One Click Demo Install, then you no longer need to import demo manually. In case you don’t use the Demo Importer, then follow the next section to import data manually.
###Import Demo Manually
Import Sample Data: If you want to go with the demo data which is available on the theme, then you’d need to import the sample data. To import the sample data manually, first go to the left sidebar (Dashboard), then choose Tools > Import > WordPress > “Install Now” (from the list), once you’ve clicked “Install Now” you’ll see the button changed to “Run Importer” click on it now. Then you will see the “Import WordPress” option which allows you to upload a .xml file from the Demo Content folder (file name: demo-content.xml) found inside the extracted folder that you get from the download theme package (a zip file).

Once you imported the demo-content, you’ll be presented with another screen where you’d need to select the user and checkmark download attachment, then finally click “Submit”. Check out the following screenshot.

Click on Contact > Contact Forms. Here you will see the central administration panel where you can manage multiple contact forms. You will also find the Contact Form 7’s default contact form, labeled Contact Form 1.

Contact Form 1 contains all the fields a basic contact form may need. This form is ready to use and can be inserted into any page and post of your website, if you wish (this is covered further on).
Alternatively, you can create your own contact form by selecting Contact > Add New.
Give your new contact form a name, and then scroll down to Form. Here you can edit the new contact form template.
Your template defines the various fields that will appear on your form, as well as the labels that appear next to those fields.

By default, Contact Form 7 adds a number of fields to new forms, including name, email, subject, message and send. More than likely, you will want to keep all of these fields.
now save it.Visit Contact Form 7 for more details